|
|
 |
 |
 |
 |
|

|
Network open source tool including:
- tcp/udp telnet
- ping/traceroute
- DNS resolver
- Whois
- Arp
- Stats and TCP/UDP/IP tables (iphelper functions)
- TCP/UDP/ICMP/CGI multithreaded scan (TCP and CGI scan could be done throw HTTP or socks proxy)
- Raw packet capture (multiple options including application name)
- Raw packet forging
- Wake on LAN and Remote Shutdown
- Interactive TCP/UDP Transparent Proxy
| |
| Last Update |
April 02 2012 |
| Version |
3.0.9 |
| Software |
|
| Source Code |
|
| Compatibility |
Windows (some functions are available only for 2000/XP),
.Net Framework 1.1
Packet forging not available since XP SP2 |
| License |
Freeware under GPL license |
| Language |
C# |
| Status |
|
|
|
|
 |
 |
 |
 |
|
|
|
|
|
- How to create TCP or UDP clients or server
- How to make a telnet
- How to make a ping
- How to make traceroute
- How to get host address (DNS resolve)
- How to get host information (Whois)
- How to retreive a MAC address on remote host
- How to view or close active tcp connections (or end process of tcp connection owner)
- How to view active udp servers
- How to view tcp stats
- How to view udp stats
- How to view icmp stats
- How to view or modify ip table
- How to view IP stats
- How to make cgi scan
- How to make tcp scan
- How to make udp scan
- How to make icmp scan
- How to make tcp or cgi scan throw proxy
- How to make a wake on LAN
- How to Shutdown a windows remote host
- How to view your computer's IP
- How to get your computer's outside IP (for people in LAN)
- How to capture packet
- How to forge packet
- What is Interactive TCP/UDP
How to create TCP or UDP clients or server
Just fill information on the thing you want to create (TCP Server, TCP Client, UDP Server or UDP client)
and then click on the associated "Start" or "Connect" button.
You can specify the local port for clients (this allows to agree with some firewall rules if there's any)
Options "Send hexa data" and "Receive hexa data" (available in version 3.02) allow to send or interpret hexa data, which can be helpfull to debug network application.
Udp specific:
The "Send echo" for udp server option send back the recieved message to the IP/Port message comes from.
The option "Watch for reply" of the UDP client create an udp server on the created local point to watch udp server replies.
 | Sample of TCP client with local port specified. Sent and recieved data are shown |
 | | The main server window. It show all new connections made |
| As soon as a TCP client is connected, a new window appears to allow to send data back to the remote host |  |
How to make a telnet
Just use TCP client on remote port 23, and if you want to open a telnet on different port, just create a new tcp client on that port and nex check the option "telnet"
 | | Using telnet option, font text is changed to get standart alignement |
How to make a ping
Click on "Icmp" Tab and then just click on "ping".
Options:
- "Looping ping" : send ping until you click the "Stop" button (usefull when to check network connection when you're modifying computer network configuration or routing configuration)
- "More than one host can reply" : use this option when you're broadcasting. In normal mode, as soon as the icmp server receive the first corresponding icmp reply (checked by identifier and sequence_number), another echo request will be sent, and other echo reply with same identifier and sequence_number will be ignored. By checking this option, the icmp server wait for timeout, retreiving all corresponding echo replies, before to send another echo request.
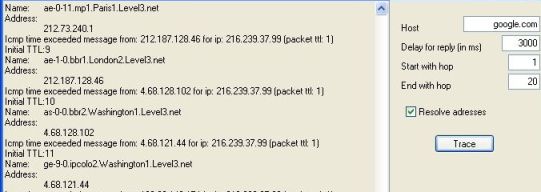
How to make a traceroute
Click on "Icmp" Tab and then just click on "trace"
Options :
- "Start hop" : the Time To Live of first echo request
- "End hop" : the Time To Live of last echo request
Only computers between "start hop" and "end hop" value will be traced (avoid to trace your gatway(s))
- "Resolve address" : resolve address of each traced host
How to get host address (DNS resolve)
Click on "DNS" Tab, enter the name or IP of host to resolve and then click "DNS Resolve"
 | | Sample for google |
How to get host information (Whois)
Click on "Whois" Tab. You can use a specific server (use option "use the following server") or let the software finding the good server. In this case, it will use the whois_servers.xml file in the application directory. You can modify it if you want. If file doesn't exists, it will be created at first use of whois
 | | Sample for google |
How to retreive a MAC address on remote host
Click on "ARP" tab, enter the remote host IP and then click on the "Send ARP button". If the remote host is found, you'll get its MAC address.
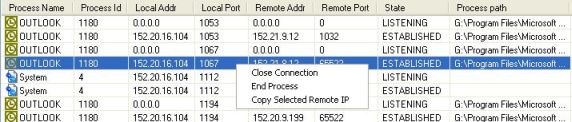
How to view or close active tcp connections (or end process of tcp connection owner)
Click on "Stats" tab, then "TCP Table". Warning, the first data retreival is quite long (5-6 seconds) because of application icon retreival; but on refresh it will be really faster.
Now you can see all tcp connections or server running on your computer. You can use the "Auto Refresh" option or manually refresh the list.
If you want to close a connection or end the process of connection owner, make a right click on wanted connection and next choose the wanted operation
How to view active udp servers
Click on "Stats" tab, then "UDP Table". Warning, the first data retreival is quite long (5-6 seconds) because of application icon retreival; but on refresh it will be really faster.
How to view tcp stats
Click on "Stats" tab, then "TCP Stats".
How to view udp stats
Click on "Stats" tab, then "UDP Stats".
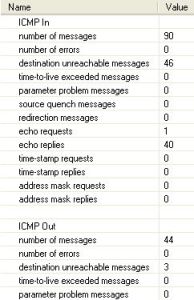
How to view icmp stats
Click on "Stats" tab, then "ICMP Stats".
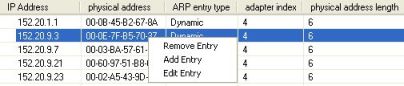
How to view or modify ip table
Click on "Stats" tab, then "IP Table".
To add, edit or remove an IP entry just make a right click in the list and then select the wanted action (Add, Edit or Remove).
You'll get the following window, allowing you to specify Ip, Mac address, ARP entry type and Adaptater index.
How to view ip stats
Click on "Stats" tab, then "IP Stats".
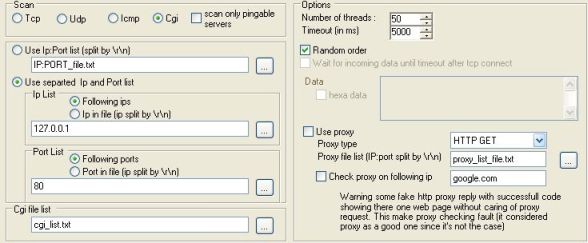
How to make cgi scan
Click on the "Scan" Tab, next the "Cgi" button.
You can choose to scan only pingable ip by checking "scan only pingable server". This can be an earn of time, but some servers deny echo request althougth they accept connection.
So to be sure you'd better to make a tcp scan before (then use the right click for copying selected IP:Port and pasting them in a file which will be used as IP:Port list)
You can choose the number of threads, time out, and to scan in a random order (this allow to check your IDS reply [or lack of reply])
For using proxy see How to make tcp or cgi scan throw proxy
You can choose to use either:
- an IP:Port file list split by \r\n
Sample:
127.0.0.1:80
127.0.0.2:81
- separeted IP and port lists (either in files or in interface)
Interface allowed separators are ";" and "-"
Samples:
127.0.0.1-127.0.0.7;127.0.0.50-127.0.0.61
21;23;25;80;1000-1024
Next you can choose your cgi file list (cgi requests split by \r\n)
Sample :
/_private/registrations.htm
/_private/registrations.txt
/_vti_bin
/_vti_bin/
At this point just click "Start" to begin scan. You can Pause/Resume or Stop the scan at any moment.
Why is there an ID:Date column ? This just allow you to see full connections step (sample tcp connection retreiving data could have 3 or more steps :connected, data arrival 1,data arrival 2,data arrival n,closed)
and as the application is multithreaded event of different connections could be mixed without this column.
 | | Sample of cgi scan result |
Right click allows you to :
- Copy IP list of selected scan results
- Copy IP:port list of selected scan results (could be used as an entry of the "Use IP:Port list" file in the scan config
- Save selected results in a text file
- Save All results in a text file
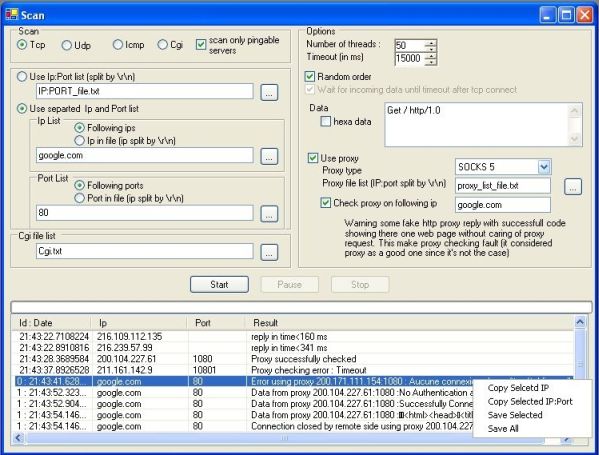
How to make tcp scan
Click on the "Scan" Tab, next the "Tcp" button.
You can choose to scan only pingable ip by checking "scan only pingable server". This can be an earn of time, but some servers deny echo request althougth they accept connection.
The option "Wait for incoming data until timeout after tcp connect" allow you to see data sent by servers (and verify if they put their version number in the reply). If this option is not checked, we just assume that a server accept connection; we won't try to read any data sent by server even if there's some reply.
The data part can contain data to be send after the connection, and allow to see server reply. Hexa data could be sent by checking the corresponding checkbox
You can choose the number of threads, time out, and to scan in a random order (this allow to check your IDS reply [or lack of reply])
For using proxy see How to make tcp or cgi scan throw proxy
You can choose to use either:
- an IP:Port file list split by \r\n
Sample:
127.0.0.1:80
127.0.0.2:81
- separeted IP and port lists (either in files or in interface)
Interface allowed separators are ";" and "-"
Samples:
127.0.0.1-127.0.0.7;127.0.0.50-127.0.0.61
21;23;25;80;1000-1024
At this point just click "Start" to begin scan. You can Pause/Resume or Stop the scan at any moment.
Why is there an ID:Date column ? This just allow you to see full connections step (sample tcp connection retreiving data could have 3 or more steps :connected, data arrival 1,data arrival 2,data arrival n,closed)
and as the application is multithreaded event of different connections could be mixed without this column.
 | | Sample of tcp scan waiting for incoming data |
Right click allows you to :
- Copy IP list of selected scan results
- Copy IP:port list of selected scan results (could be used as an entry of the "Use IP:Port list" file in the scan config
- Save selected results in a text file
- Save All results in a text file
How to make udp scan
Click on the "Scan" Tab, next the "Udp" button.
You can choose to scan only pingable ip by checking "scan only pingable server". This can be an earn of time, but some servers deny echo request althougth they accept packets.
The data part can contain data to be send to the server. Hexa data could be sent by checking the corresponding checkbox.
You can choose the number of threads, time out, and to scan in a random order (this allow to check your IDS reply [or lack of reply])
You can choose to use either:
- an IP:Port file list split by \r\n
Sample:
127.0.0.1:80
127.0.0.2:81
- separeted IP and port lists (either in files or in interface)
Interface allowed separators are ";" and "-"
Samples:
127.0.0.1-127.0.0.7;127.0.0.50-127.0.0.61
21;23;25;80;1000-1024
At this point just click "Start" to begin scan. You can Pause/Resume or Stop the scan at any moment.
 | | Udp scan ordered by result |
Right click allows you to :
- Copy IP list of selected scan results
- Copy IP:port list of selected scan results (could be used as an entry of the "Use IP:Port list" file in the scan config
- Save selected results in a text file
- Save All results in a text file
How to make icmp scan
Click on the "Scan" Tab, next the "Icmp" button.
The data part can contain data to be send to the server as the echo request data field. Hexa data could be sent by checking the corresponding checkbox.
You can choose the number of threads, time out, and to scan in a random order (this allow to check your IDS reply [or lack of reply])
You can choose to use either (even if icmp scan don't care about port)
- an IP:Port file list split by \r\n
Sample:
127.0.0.1:80
127.0.0.2:81
- separeted IP and port lists (either in files or in interface)
Interface allowed separators are ";" and "-"
Samples:
127.0.0.1-127.0.0.7;127.0.0.50-127.0.0.61
21;23;25;80;1000-1024
At this point just click "Start" to begin scan. You can Pause/Resume or Stop the scan at any moment.
 | | Icmp scan result |
Right click allows you to :
- Copy IP list of selected scan results
- Save selected results in a text file
- Save All results in a text file
How to make tcp or cgi scan throw proxy
For the Tcp and Cgi scan, you can use connection throw a proxy. Just check the "Use proxy" option. 4 proxy types are available : HTTP GET, HTTP CONNECT, SOCKS 4 and SOCKS 5 (only no authentification proxy are supported).
Next you need to enter the path of your IP:Port proxy list. Scan will be done using the full proxy list to make it more furtive. Proxy can be tested with a wellknown web page (like google, yahoo...); it allows to use only online proxy for the scan, as each proxy is checked the first time scan want to use it.
To enable this feature just check "Check proxy on following IP".
Warning some fake proxy list give you some "proxy" which reply allways with 200 OK code showing an advertising web page, so it make the checking fail. If you have any doubt on a proxy just test it with your browser.
WARNING using proxy, your connection needs more time to establish, so increase the timeout (don't fear 15 or 20 seconds) else you'll get lot of timeout results althought servers are alive.
How to make wake on LAN
Click on "Wake On Lan" tab. Enter the MAC address of the computer you want to wake up. You can specify a broadcast IP (Warning you must check that your gatway allows brodcast), and an Udp port number (For firewall or NAT, in other case you can set the port to the value you want, because the "magic packet" is in the udp data fields).
By clicking on "Wake" button an udp broadcast message containing a "magic packet" will be send on the network.
How to Shutdown a windows remote host
Click on "Wake On Lan" tab.
Fill the computer's ip or network path field. Next you can modify some options like the message to be display, the timeout before shutdown, if applications are forced to be closed and if computer should reboot after shutdown.
To launch the shutdown, just click on the "Initiate" button. The following window will be displayed on the remote host
") | | Shutdown in action (French message sorry) |
You can abort the shutdown after having initiate it by clicking the "Abort" button.
Warning you must have sufficient privileges on remote computer for doing these actions.
How to view your computer's IP
Click on "Computer's IP" tab. The "Local IP(s)" group gives you your computer's name and your IP addresses.
How to view your computer's outside IP (for people in LAN)
Click on "Computer's IP" tab. In the "Outside IP" group, you can configure the server used to retreive your external IP (default value is "checkip.dyndns.org").
When just click the "Get" button and your outside IP will be retreived.
How to capture packets
Go to the Capture window (Tab "Raw Packet" then "Capture").
To capture packets, you have to check protocol you want to capture.
 | | Here we are capturing tcp and icmp packets |
Next, for each protocol you can specify special filters. Another filter is available for tcp/udp connection: this is the "Application filter"
The option "Packet's details" allow to show generally usless header fields. By checking this, all header fields are shown.
You can start/stop capture using the coresponding buttons.
The "Clear" button allows to clear the list of captured packet.
The "Load" button allows you to load a previous saved capture in txt or xml format.
Tcp filters :
- Source Ip
- Destination Ip
- Source Port
- Destination Port
- Sequence Number
- Acknowledgment Number
- Data Offset
- Window Size
- Control (URG,ACK,PSH,RST,SYN,FIN)
 | | In this sample we are capturing only packets sent to and received from ip 10.0.0.138 port 80 |
Udp filters :
- Source Ip
- Destination Ip
- Source Port
- Destination Port
- Length
 | | Udp filters |
Icmp filters :
- Source Ip
- Destination Ip
- Icmp packet type (Destination Unreachable, Echo, Echo Request, Information Request, Information Reply, Parameter Problem, Redirect, Source Quench, Time Exceeded Message, Timestamp, Timestamp Reply
 | | Icmp filters |
Unknown protocol filters :
- Source Ip
- Destination Ip
- Protocol Number (allowed separators are ";" and "-". Sample 20-25;80)
 | | Filters available for unknown protocol |
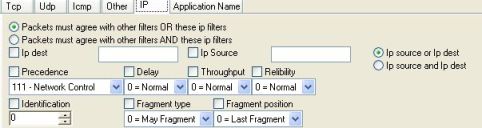
Ip filters :
- Source Ip
- Destination Ip
- Precedence
- Delay
- Throughtput
- Relibility
- Identification
- Fragment Type
- Fragment Position
Application filters options:
- "Get application name for all tcp connection and udp server data" : each packet captured will get its corresponding application name.
- "Capture only tcp client / server and udp server data of the following applications" : Only packets coresponding to the application list will be captured. Use the "Add" and "Remove" buttons to manage this list.
- "Capture all client udp data" : in the case of capturing only packets of the applications, we can't know which application is the owner of an udp client, so some udp packets could be lost. Check this option if you want to capture all udp data.
 | | In this sample, we will capture only packet sent/received by Internet Explorer |
Packets are shown in a list, allowing to you to order them by source IP ,destination IP... by clicking the corresponding column
Right click allow you to :
- Clear list
- Copy selected packets in Clipboard
- Save selected packets in txt or xml format
- Save all packets in txt or xml format
- View protocol data in an hexa viewer
- View full packet in an hexa viewer
 | | Sample of hexa viewing |
How to forge packets
Go to the Forge window (Tab "Raw Packet" then "Forge"). Three different easy forging interfaces are available for tcp,udp and icmp;and another generic interface for other protocols is also available
For all protocols, you can configure all IP header fields options that means :
- Version
- IHL
- Precedence
- Delay
- Precedence
- Throughput
- Relibility
- Total Length
- Identification
- Fragment type/position/offset
- TTL
- Protocol number
- Checksum
- IP source
- IP dest
- Options
Some fields have the "Random" option which allows you to test your firewall/IDS reactions.
Notice : random fields are computed separately for each sent packet
What is the option "Auto" for length and checksum ?
If you don't want to forge bad packets, you just check these options, so the fields are computed and you don't need to comput them manualy.
Protocol data could be ASCII or hexa depending the "Hexa values" option
At this point you just need to specify the number of packets you want to send.
If you select the "Looping" option, packet are send until you push the "Stop" button.
Just click "Send" to begin packets sending
 | | Unknown protocol forge |
Tcp specific forge allows you to configure the following tcp header fields:
- Source port
- Destination port
- Sequence Number
- Acknowledgment Number
- Data offset
- Control options (URG, ACK, PSH, RST, SYN, FIN)
- Window
- Checksum
- Urgent pointer
- Options
What is the option "Use Connection Helper" ?
This option allow you to auto fill necessary fields, preparing good options for the next packet of a tcp connection. Warning, if you're using your own ip address, windows will send reset tcp packet automatically to the remote host. To continue connection, just use a firewall and deny reset packet during the time you're forging.
 | | TCP forge |
Udp specific forge allows you to configure the following udp header fields:
- Source port
- Destination port
- Length
- Checksum
 | | UDP forge |
Icmp specific forge allows you to configure,depending the icmp message, the following icmp header fields:
- icmp message
- icmp code
- checksum
- Pointer
- Gatway Internet Address
- Identifier
- Sequence number
- Originate Timestamp
- Receive Timestamp
- Transmit Timestamp
 | | ICMP forge |
What is Interactive TCP/UDP
This feature creates a transparent TCP and UDP proxy, giving you all right on the transfer.It allows you to act like a man in the middle. You can allow or block transfert of each packet, and send data you like either to client or server.
You can save result in html format.
 | | Here an use to debug Telnet protocol for NetworkStuff |
|
|
|
|
|
|
|
|
|
|
|
|
- When sniffing, you see no outgoing packets. In fact some firewalls block outgoing packet capture, so
stop (temporarly of course) your firewall to resolve this trouble.
- Stats icon retreival is quite long at the first time (before refresh or autorefresh). It will may take 5-6 second to show icons and connections. After icons are in memory so there's no significant time to show stats icons.
- Packet forging under XP SP2.
As Microsoft makes something good for developpers by allowing packet forging, it can't leave it in it's OS. So they begin to sucks again with XP SP2.
They put lots of restriction to packet forging (see description below)
Solutions are
1) Keep SP1
And if it is too late
2) patching the dll allowing or not sending of packets (remember disassembling is illegal)
3) or install winpcap and use API of the provided library (until Microsoft allows the install of Winpcap and don't claims it's a virus)
Extract of the new features about which Microsoft is very proud of (original document)
What new functionality is added to this feature in Windows XP Service Pack 2?
(Don't joke please, Microsoft says it's new functionality)
Restricted traffic over raw sockets
Detailed description
A very small number of Windows applications make use of raw IP sockets, which provide an industry-standard way for applications to create TCP/IP packets with fewer integrity and security checks by the TCP/IP stack. The Windows implementation of TCP/IP still supports receiving traffic on raw IP sockets. However, the ability to send traffic over raw sockets has been restricted in two ways:
| • |
TCP data cannot be sent over raw sockets. |
| • |
UDP datagrams with invalid source addresses cannot be sent over raw sockets. The IP source address for any outgoing UDP datagram must exist on a network interface or the datagram is dropped. |
Why is this change important? What threats does it help mitigate?
This change limits the ability of malicious code to create distributed denial-of-service attacks and limits the ability to send spoofed packets, which are TCP/IP packets with a forged source IP address.
Limited number of simultaneous incomplete outbound TCP connection attempts
Detailed description
The TCP/IP stack now limits the number of simultaneous incomplete outbound TCP connection attempts. After the limit has been reached, subsequent connection attempts are put in a queue and will be resolved at a fixed rate. Under normal operation, when applications are connecting to available hosts at valid IP addresses, no connection rate-limiting will occur. When it does occur, a new event, with ID 4226, appears in the system’s event log.
Why is this change important? What threats does it help mitigate?
This change helps to limit the speed at which malicious programs, such as viruses and worms, spread to uninfected computers. Malicious programs often attempt to reach uninfected computers by opening simultaneous connections to random IP addresses. Most of these random addresses result in a failed connection, so a burst of such activity on a computer is a signal that it may have been infected by a malicious program.
What works differently?
This change may cause certain security tools, such as port scanners, to run more slowly.
How do I resolve these issues?
Stop the application that is responsible for the failing connection attempts.
|

|
|
|
|
|
|
|
|
|


;)